
Penn Tile Kilns – How they worked
The Beacon Hill tilery at work. Drawn by Mike Lamont
The Penn tilers of the 14th century were remarkable specialists, particularly those who made the decorated floor tiles. They possessed an extraordinary store of knowledge and skills about the selection of clays, the techniques of decoration, the making of glazes and the construction and control of kilns to reach a particular temperature. No one in recent years has been successful in making even half-way acceptable tiles using the methods and techniques available to them at the time.
The shape and size of a kiln were decided by the shape and type of its wares. A typical medieval floor tile kiln probably consisted of a rectangular or roughly square oven above a furnace area, about 6ft (1.83m) square internally, heated by two parallel flues or fire boxes which were arched tunnels up to 2 ft (0.6m) wide and 3 ft (0.9m) long, sloping gently down from the furnace. The furnace would normally be below ground level to provide insulation and support and was fuelled by wood, typically oak and hornbeam, fed from the stokehole outside the end of the fireboxes. A typical roof tile kiln would have exactly the same arrangements but with a rather longer rectangular furnace and oven, say 7ft 6 ins x 6ft (2.28m x 1.83m).
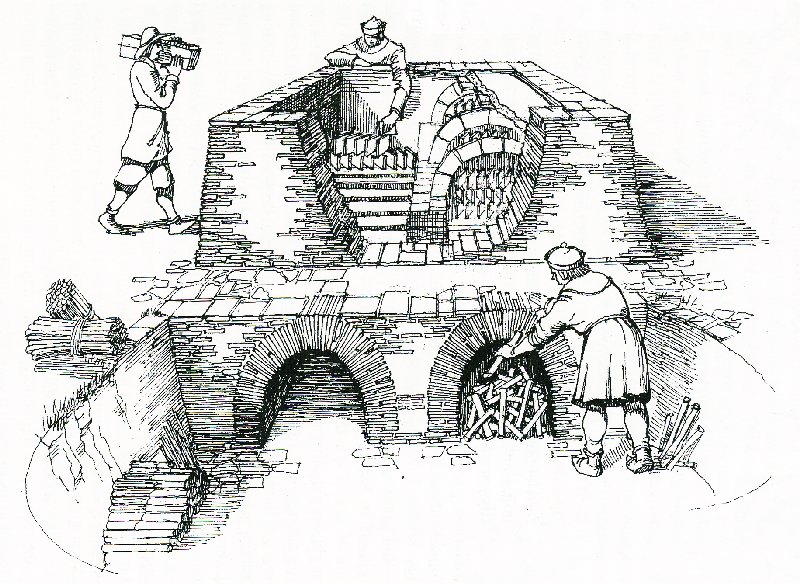
A typical 14th century tile kiln with front wall removed to show the inside. this drawing is an imaginative reconstruction based on all the information available. Tilers are shown preparing for firing by putting firewoood into one of the two stoke holes, bringing a box of tiles and stacking them in the kiln. Drawn by Mike Lamont.
The furnace was spanned with a series of arches five or six inches apart springing from each side wall to a low central wall. The gaps between the arches allowed the heat to rise up through the oven above, and were bridged with roof tiles to form a level floor on which the tiles for firing were stacked on edge, one on top of the other in an ingenious succession of tiers at an oblique angle to the one above and below. This arrangement led the fire upward through ever diminishing apertures and distributed the heat as equally as possible from bottom to top. It was the way in which the tiles themselves were stacked that created the flues that drew the fire through the kiln, and so a kiln could not be fired until it was full.
The different parts of the kiln were built of roof tiles stuck together with clay and the oven walls could be up to 4 ft or even 6 ft above ground level to make room for more tiers in the oven. There was no side entrance to the kiln and so loading and unloading were carried out by climbing over the top of the wall. The top of the oven was temporary and constructed for each firing. It was made of three or more layers of old tiles stuck together with clay, with gaps to allow the heat to rise through the oven. By placing other tiles over these gaps the draught through the furnace and oven, and hence the temperature, could be controlled.
Control of the temperature was vital. If it was too low, the tile was under-fired with a soft friable fabric. Over 1,000°C was needed to flux the glaze so that it melted and combined with the clay body, but at 1,100°C the tile bodies themselves would begin to melt if the clay was not carefully chosen, vitrifying and turning purple, hard, brittle and often warped. Even with skilled management there was an unavoidable difference of 200° C between the hottest, bottom front and the coolest, top back of the oven and hence there were always some over-fired and some under-fired waste products to discard after each firing. Without any thermometers, the tilers had to use their experience to judge the temperature by the colour of the tiles at the top of the oven and in the temporary roof. The smaller the oven, the more control the tilers had over the temperatures throughout it. Glazed roof tiles needed the same high temperatures but plain roof tiles needed less heat and so could be made in a larger kiln.
When it was raining hard, the kilns could not be used and they were generally only fired in June, July and August. A typical firing took a week. On Monday, the tiles were stacked in the oven, on edge and in tiers, and a temporary roof was constructed. On Tuesday and Wednesday, a slow-drying fire was lit, with an oven temperature of less than 200° C, in order to drive out any moisture in the clay tiles that might otherwise expand and burst. On Thursday, the temperature was raised to between 1,000 and 1,100° C with a final firing with brushwood faggots to send flames shooting right through the oven to clean the tiles by burning up any bits of ash or dirt on them. The mouths of the fire boxes and apertures in the roof were then closed to prevent an influx of cold air cracking or breaking the tiles whilst they were still too hot. On Friday and Saturday, when the kiln had cooled down enough, the roof was dismantled and the oven unloaded. Spoilt tiles that could not be used as kiln furniture were carted away and dumped in disused pits or on fields where we find them today.
For more detailed information see Miles Green’s book ‘Medieval Penn Floor Tiles’ available from the Penn and Tylers Green Website.
Miles Green, Village Voice, 2025